“Picture this: a workout that not only transforms your body but also adds an element of playfulness and excitement to your fitness routine. That’s where the magic of stability ball exercises comes into play.
These vibrant, bouncy spheres might just be the secret ingredient your workouts have been missing. Say goodbye to the monotony of traditional exercises and say hello to a world of dynamic challenges that target your core, improve your balance, and enhance your overall strength.
So, grab your stability ball and let’s bounce our way to a more invigorating and empowering workout experience!”
Best stability ball exercises
- Stability ball hamstring curl
- Stability Ball Squat
- Stability Ball Preacher Curls
- Stability Ball Chest Press Locomotive
- Stability Ball Jackknife
- Stability Ball Ab Rollout
- Stability Ball Bicycles
- Stability Ball Side Plank
- Stability Ball Split Squat
Stability ball hamstring curl
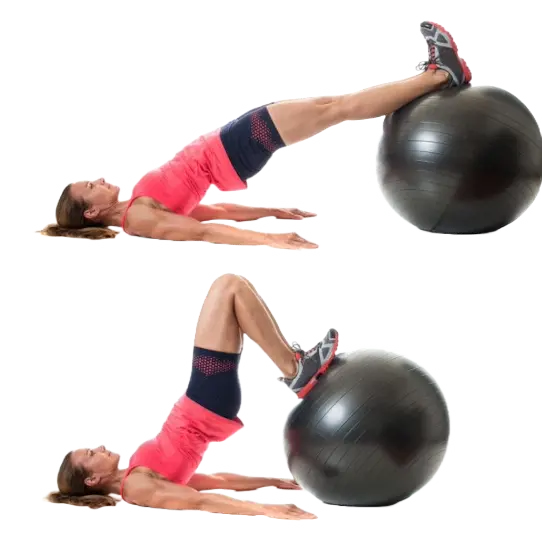
How to do it:
Step 1: Set Up
Start by finding an open space with a clear area for the stability ball exercise. Now, place the stability ball on the floor and lie down on your back.
Position yourself with your feet resting on top of the ball, hip-width apart. Your heels should be pressing into the ball’s surface.
Step 2: Initial Position
Begin the exercise by lifting your hips off the ground, your body should form a straight line from your shoulders to your heels. Moreover, engage your core muscles to maintain stability.
Keep your arms relaxed by your sides, palms facing down.
Step 3: Perform the Movement
With control, bend your knees and roll the stability ball toward your glutes by curling your heels. Continue to lift your hips as you do this.
As you curl the ball in, focus on contracting your hamstrings and squeezing your glutes, this is the top position of the movement.
Hold the curled position for a brief pause, ensuring you maintain your balance and engagement in your core muscles.
Step 4: Return to Starting Position
Slowly extend your legs by rolling the ball away from your glutes. Your hips will lower as you do this.
Return to the initial bridge position with your hips lifted off the ground.
Step 5: Complete the Repetitions
Repeat the movement for the desired number of repetitions. Moreover, aim for around 10-15 reps to start, gradually increasing as your strength improves.
Additionally, remember to breathe steadily throughout the exercise, inhaling as you curl the ball in and exhaling as you extend your legs.
Step 6: Cool Down
After completing the desired number of repetitions, gently lower your hips back to the ground and place your feet flat on the floor.
Now, take a moment to stretch your hamstrings and glutes by lying flat on your back and bringing one knee toward your chest, holding it for a few seconds before switching to the other leg.
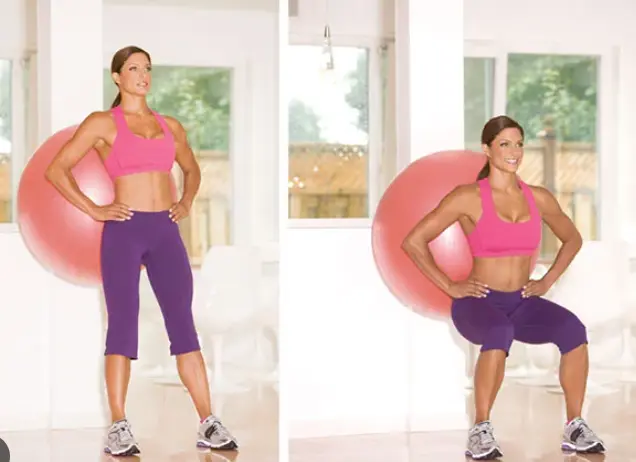
Stability Ball Squat
How to do it:
Step 1: Set Up
First off, clear a bit of space and place the stability ball against a wall. It’s your trusty support buddy for this move. Make sure it’s nestled around your mid to lower back region. Stand facing away from the wall, feet comfortably apart, and toes slightly turned outward.
Step 2: Get Set
Lean gently into the stability ball, feeling it support your back. Stretch your arms forward, balancing them out like you’re about to take on the world.
Step 3: Dive into the Squat
Here’s where the magic happens. Start bending both your knees and hips at the same time.
Imagine you’re settling into an invisible chair. Keep your chest up, back straight, and eyes looking forward throughout the movement.
Go as low as you can – thighs parallel to the ground is the goal. Your knees should neatly align with your ankles, and your weight should hang out evenly across your feet.
Step 4: Back to Base
Push through your heels like you mean it and stand right back up. Tighten that core as you do. Exhale as you return to your feet.
Step 5: Reps on Reps
Knock out as many squats as you’ve got on your workout agenda. Start with 10-15 reps and adjust according to your fitness game.
Step 6: Wind Down
After your session, step away from the stability ball and give your quadriceps and hamstrings a gentle stretch to say thanks for the hard work.
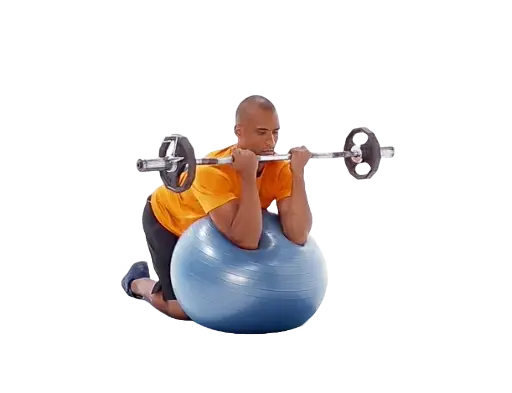
Stability Ball Preacher Curls
How to do it:
Step 1: Get Ready to Roll
Find yourself a comfy spot to rock those stability ball preacher curls and place the stability ball right in front of you and kneel down behind it. Now, lean over that ball like you’re catching a quick breather during a workout.
Step 2: Set the Stage
Grab a dumbbell in each hand, making sure your palms are facing up – we’re going for that underhand grip and let your arms hang loose over the ball. Don’t lock those elbows, keep them a bit bent.
Step 3: Bring on the Curl
Ready? Start flexing those elbows, curling those dumbbells up towards your shoulders.
As you do, keep your upper arms nice and steady against the ball. Feel those biceps doing their thing, and give them a good squeeze at the top of the curl. And hey, no swinging – we want this to be pure muscle power.
Step 4: Easy Does It
Lower those weights back down with grace, fully stretching your arms. Keep your core engaged – we’re still besties with that stability ball.
Step 5: Rep It Out
Now’s the time to get into the groove. Do the curling action for as many reps as you’ve got on your radar. Maybe start with 10-12 reps, but hey, adjust that based on how your muscles are feeling.
Step 6: Wind Down
All done? Awesome. Put those dumbbells aside and gently rise up from the stability ball. Give your biceps a little love by stretching one arm in front and pulling those fingers back with the other hand.
Stability Ball Chest Press Locomotive
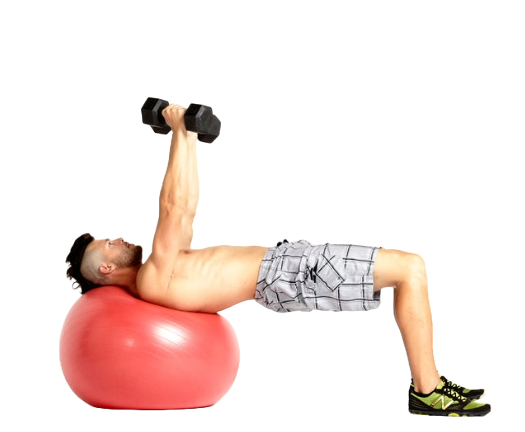
How to do it:
Step 1: Get Ready to Rock
Find yourself a comfy spot to give the stability ball chest press locomotive a shot. Lay back on that stability ball, so your upper back and head are chilling on it. Your feet should be planted firmly on the ground.
Step 2: Grab Those Dumbbells
Hold a dumbbell in each hand, arms reaching up toward the ceiling. Make sure your palms are looking away from you, and your hands are a bit wider than your shoulders.
Step 3: Let’s Roll with the Press
Start by bending your elbows until they’re at a nice 90-degree angle. Furthermore, your upper arms should be straight out from your shoulders, like you’re about to give someone a solid high five.
Step 4: Full Steam Ahead
As you press those dumbbells up toward the sky, lift your hips off the ball and start stepping your feet forward, one at a time. It’s like you’re moving forward on a little adventure while pressing those weights.
Step 5: Reverse Back to Start
Bring those dumbbells back down to your chest as your hips settle back on the ball. Step your feet back, and you’re back to where you began.
Step 6: Cool It Down
When you’ve nailed your set, sit up gently and set those dumbbells down. Stretch out your chest by locking your hands behind your back and slowly raising your arms.
Stability Ball Jackknife
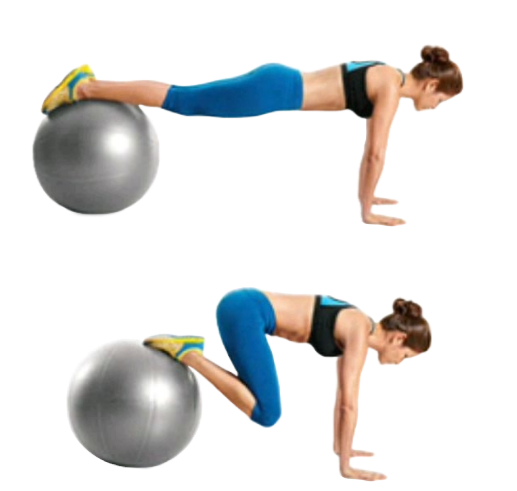
How to do it:
Step 1: Get in Position
First off, set up shop in a spot where you can move around freely. Moreover, place the stability ball on the ground and take on a push-up position.
Your hands should be under your shoulders, and your shins should be resting on the ball. Imagine a straight line from your head to your heels.
Step 2: Ready, Set, Go
Start the action with your core all tucked in and your back nice and straight. Your hands are firmly planted on the floor, just under your shoulders.
Step 3: Rock the Jackknife
Here’s the fun part. Roll that stability ball toward your chest using your feet. As you do, your hips will pop up, and your knees will come closer to your chest. It’s like you’re folding at the hips.
Step 4: Reset Mode
After that fantastic jackknife move, slowly push the ball away with your feet to get back to your starting push-up position. Your hips will drop, and your body will be straight as a board.
Step 5: Rep It Out
Repeat that jackknife goodness for as many rounds as you’re up for. Around 10-15 reps is a solid starting point.
Step 6: Take a Breath
When you’re done, step off the stability ball and give your core a nice stretch. Reach your arms up overhead and let your body unwind.
Stability Ball Ab Rollout
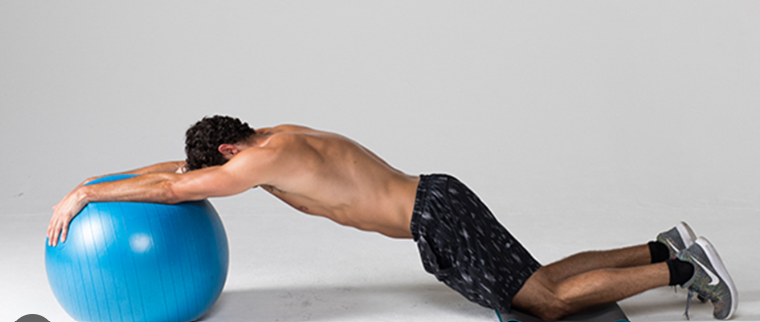
How to do it
Step 1: Get Ready to Roll
Find yourself a comfy space where you can get down to business. Place that stability ball on the floor and kneel down in front of it and make sure your knees are hip-width apart and your shins are resting on the ball.
Step 2: Let’s Get Going
Put your hands on top of the ball, about as wide as your shoulders. and spread out those fingers for a solid grip. Keep those arms straight and your core in check – we’re building that foundation.
Step 3: The Rollout Begins
Now’s the time to make things interesting. Start pushing that ball forward as you stretch your arms out., your body will follow the ball, and you’ll be in a plank position. Additionally, tighten up that core to keep everything steady.
Step 4: Time to Roll Back
Once you’ve extended your arms and reached a point where you’re feeling the burn, start rolling the ball back toward your knees. Your hips will lift, and you’re back to where you started.
Step 5: Rep It Out
Rock that rollout action for a few rounds. Start with 8-10 reps and take it from there. Remember to keep that core engaged and steady throughout the whole move.
Step 6: Wind Down
When you’re done, step off the ball with care and take a second to stretch out that core by reaching your arms up and over.
Stability Ball Bicycle crunches
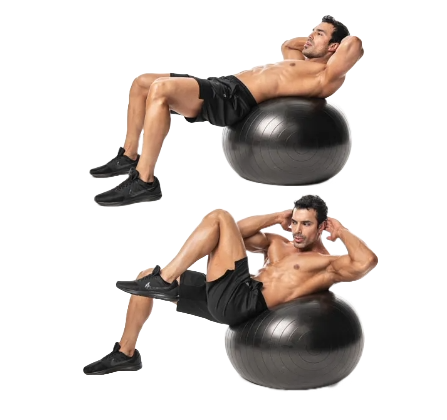
How to do it
Step 1: Get Set Up
Find a cosy spot where you can really get into the groove. Put that stability ball on the floor and lie down on your back. Let the ball support your lower back, and keep your feet flat on the ground.
Step 2: Ready, Set, Go
Place your hands gently behind your head – don’t lock those fingers together. Your elbows should be nice and wide, and your chin just a bit up.
Step 3: Ride that Bicycle
Lift your head, neck, and shoulders a tad off the ball while pulling your knees toward your chest. That’s your starting position.
Start pedalling – straighten your right leg while twisting your upper body to bring your left elbow toward your right knee. At the same time, stretch your left leg out but don’t let it touch the ground.
Now switch it up – bend your right knee, extend your left leg, and twist your upper body to bring your right elbow to your left knee. Keep this pedal-pushing going, all while your core is locked and loaded.
Step 4: Find Your Tempo
No need to rush this ride. Keep your bicycle motion smooth and under control. And don’t forget – your core is the star here, so make sure it’s engaged throughout.
Step 5: Do Your Reps
Aim for around 15-20 reps on each side. Adjust that number based on how you’re feeling and your fitness level.
Step 6: Cool It Down
When you’re done, gently lay your head and feet back on the stability ball. Take a moment to breathe, and there you have it!
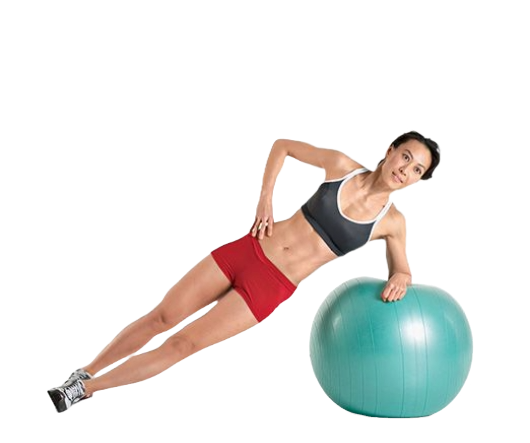
Stability ball side plank
How to do it:
Step 1: Find Your Spot
Set up shop in a comfy spot where you’ve got some room to work. Put that stability ball on the ground and get ready to show those obliques some love.
Step 2: Get That Position Right
Lie on your side with the ball under your hip so that your bottom elbow should be right under your shoulder, and your legs stretched out straight. Stack those feet on top of each other.
Step 3: Lock It In
Rest your bottom forearm on the ball at a comfy 90-degree angle with your top arm chilling on your hip or reach up – your call.
Step 4: Raise Those Hips
Lift those hips off the ground, creating a straight line from your head to your feet. Squeeze that core and those obliques – they’re the stars of the show. Moreover, keep things in line, no sagging or twisting allowed.
Step 5: Hold That Pose
Hang out in that side plank as long as you can rock it. Start with around 15-30 seconds on each side. And hey, don’t forget to breathe and keep that core engaged.
Step 6: Lower and Relax
Bring those hips back down and gently roll off the ball. Give yourself a little pat on the back – you nailed it!
Step 7: Switch It Up
If you’re going for more sets, switch to the other side and do it all over again.
Step 8: Cool It Down
When you’re done, take a sec to stretch out those sides by reaching your arms overhead and giving yourself a little stretch.
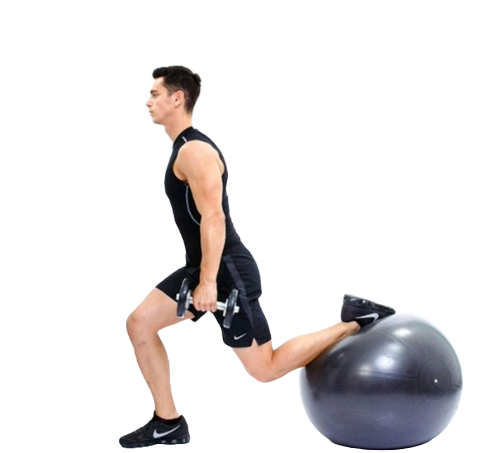
Stability ball split squat
How to do it:
Step 1: Set Up the Scene
Find a comfortable spot to work out. Put that stability ball against a wall and stand a bit away from it.
Step 2: Getting Started
Position one foot behind you and place it on top of the stability ball. Importantly, your other foot should be a few steps forward, and your knee should be right above your ankle.
Step 3: Get Squatting
Start lowering that back knee toward the ground. Your front knee should stay aligned with your ankle. Go as low as you can while keeping your balance in check.
Step 4: Rise and Shine
Push through your front heel to stand back up. Engage that core to keep steady.
Step 5: Rep It Out
Do 10-12 reps on each leg. Keep things nice and controlled – it’s all about quality over quantity.
Step 6: Switch It Up
Once you’ve conquered one leg, switch over and give the other one a shot.
Step 7: Cool Down
When you’re all done, give your legs a little love by stretching them out with a gentle lunge.
Benefits of stability ball exercises
1.Strengthen your Core: Ever tried a stability ball? It’s a game-changer for your core muscles. Balancing on it during exercises fires up your abs, lower back, and even your pelvic muscles. Say hello to a rock-solid core!
2. Get Your Balance On Using a stability ball might seem wobbly at first, but that’s the magic as It challenges your balance and coordination by making you work those smaller stabilizing muscles. You’ll be waltzing through life with better balance and body awareness.
3. Make Everyday Moves Easier: Those stability ball exercises? They mimic real-life actions. That means you’re not just working out; you’re getting ready for whatever the day throws at you. Practical training at its finest!
4. Stand Tall: Posture on point? Stability balls demand it. Balancing properly keeps your posture in check, which means less slouching and fewer aches. Your back will thank you.
5. Muscles All Around: A stability ball workout hits multiple muscle groups in one shot. Do you think a squat’s just for legs? Nope! It’s working your core and stabilizing muscles too. Maximum muscle engagement FTW.
6. Mix It Up: With a stability ball, your workout variety skyrockets. From strength to flexibility, it’s a one-stop shop for different exercises that hit different spots.
7. Easy on the Joints: If you’re not a fan of high-impact stuff, the stability ball’s got your back. Moreover, Low-impact workouts mean less strain on joints, which is gold for those with sensitive knees or anyone craving a gentler option.
8. Flexibility Boost: Doing stability ball exercises feels like a stretchy dream. In addition to this, the movements give your muscles a good stretch and encourage flexibility.
9. Fitness with a Smile: Trust us, working out with a stability ball is fun. The unpredictable bounce and challenges keep things interesting and keep you engaged – both in body and mind.
10. Convenient and Affordable: Grab a stability ball, and you’re set as they’re budget-friendly and take up minimal space. Furthermore, you can use them practically anywhere – home, gym, park – talk about convenience.
What stability ball size should you get?
Choosing the right size stability ball depends on your height. Here’s a general guideline to help you select the appropriate size:
45 cm Stability Ball: Best for individuals up to 5 feet tall (150 cm).
55 cm Stability Ball: Suitable for individuals between 5 feet to 5 feet 6 inches tall (150-168 cm).
65 cm Stability Ball: Ideal for individuals between 5 feet 7 inches to 6 feet 1 inch tall (170-185 cm).
75 cm Stability Ball: Recommended for individuals over 6 feet 2 inches tall (188 cm).
FAQS
Are stability balls good for exercise?
Yes, stability balls are excellent for exercise, they add challenge and engagement to various workouts, making them beneficial for improving core strength, balance, and overall fitness.
What muscles do stability balls work out?
Stability balls work out core muscles, including abdominals, obliques, and lower back. Furthermore, they also engage in stabilizing muscles, enhancing balance and coordination.
What are stability balls good for?
Stability balls are great for strengthening core muscles, improving balance, increasing flexibility, and adding variety to workouts. In addition, they also offer low-impact options for joint-friendly exercises.
How do you improve balance with a stability ball?
To improve balance with a stability ball, perform exercises like squats, lunges, and planks on the ball as these movements engage stabilizing muscles, enhancing your sense of balance and coordination.
How long should you sit on a stability ball?
If using a stability ball as a chair, start with short intervals of 20-30 minutes, gradually increasing over time. Importantly, listen to your body and change positions regularly to avoid strain.
Conclusion
When it comes to staying fit, the stability ball is like a secret weapon. It adds a fun twist to your workouts! We’ve uncovered the best stability ball exercises that can totally change your game.
From making your core super strong with stability ball planks to giving your legs a workout with stability ball squats – these exercises are pretty awesome.
Ready to dive in? Grab that stability ball and give these exercises a try. Imagine having a stronger core, better balance, and feeling awesome overall.
It’s all waiting for you with these exercises. Don’t just read about them – actually, give them a shot. Let’s get moving and have some fun while we’re at it!
Related Articles:
About me

Hi, I am Abdullah, a guy whose passion for fitness led to his bachelor’s degree in exercise science, for me what started as a personal fascination soon transformed into a professional career. Over the last six years, I have had the privilege of guiding and supporting numerous individuals on their own fitness journeys. Whether they were beginners taking their first steps into the gym or seasoned athletes aiming to break their personal records, I have been there every step of the way, providing personalized training programs tailored to their unique needs and goals.