Your barbell is more than just a piece of gym equipment. It’s a steadfast companion that supports you through every heavy lift, every personal record.
But have you ever stopped to think about how much care and attention it deserves?
Your duty is to clean your barbell and other equipment as it not only enhances its performance and lifespan but also ensures your safety during those intense lifting sessions.
Although most people don’t bother cleaning their barbells, we recommend you should.
It’s all about removing the rust from the barbell and lubricating its sleeves. Don’t worry we will tell you in detail about how to clean a barbell.
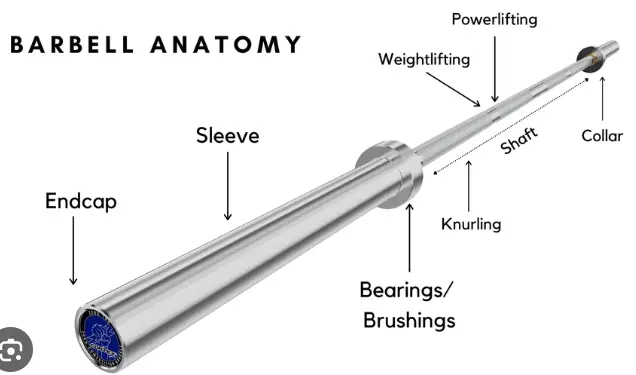
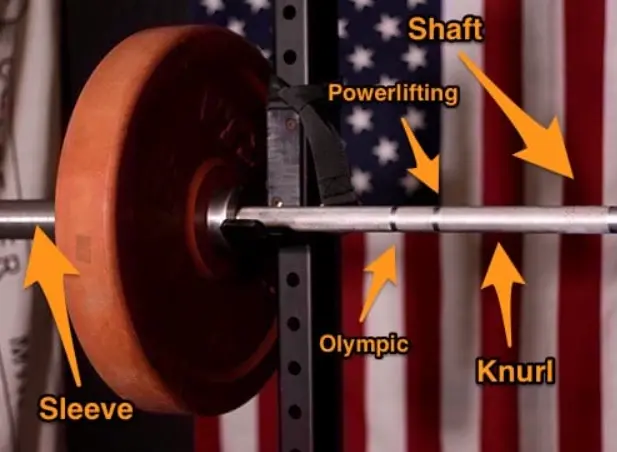
The parts of a barbell
YOU CAN SKIP TO CLEANING PROCESS IF YOU ALREADY KNOW THIS
Barbells are used for different chest, back, biceps, triceps, shoulders and even leg exercises.
Shaft: The shaft is the long, straight part of the barbell. It is typically made of steel and is 7 feet long. You can know more about barbell lengths here
The shaft has a knurled section in the middle, which provides a grip for the lifter’s hands.
The shaft also has sleeves on either end, which are used to load weight plates.
Sleeves: The sleeves are the cylindrical ends of the barbell. They are made of steel and have a threaded hole in the centre.
Weight plates are loaded onto the sleeves by screwing them onto the threaded holes.
Knurling: The knurling is the rough, textured surface on the shaft of the barbell. It provides a grip for the lifter’s hands, especially during heavy lifts.
The knurling is typically located in the centre of the shaft, where the lifter’s hands are placed during most lifts.
Bearings: The bearings are the mechanisms that allow the sleeves to spin independently from the shaft.
This allows the lifter to rotate the barbell during lifts, such as the clean and jerk.
Collar: The collar is a metal ring that is placed on either end of the barbell to prevent the weight plates from sliding off.
Centre knurl: Some barbells have a knurled section in the centre of the shaft, in addition to the knurling in the middle. This centre knurl is typically used for lifts that require a more secure grip, such as the deadlift.
End caps: The end caps are the plastic or metal caps that cover the ends of the sleeves.
They help to protect the sleeves from damage and also provide a visual cue for the lifter to know where to place their hands.
What to use to clean barbell
- Nylon brush: The ultimate barbell cleaning brush
- Snap ring pliers
- 3 in 1 oil
- Gloves[not necessary](if available then perform all actions using gloves)
- Microfibre cloth
A detailed guide on how to clean a barbell
9 steps to Clean barbell knurling and shaft
Wiping off: Wipe off any apparent dust or mud using the microfiber cloth.
Prepare the Cleaning Solution: Mix a small amount of your chosen cleaning solution with water according to the manufacturer’s instructions.
Alternatively, if using dish soap, add a few drops to a bowl of warm water.
Dampen the Cloth or Towel: Moisten a microfiber cloth or towel with the cleaning solution. Make sure it is damp but not dripping wet.
Apply the Cleaning Solution: Gently rub the damp cloth or towel along the length of the barbell’s knurl.
Focus on the areas where dirt, sweat, and chalk tend to accumulate. Apply light pressure to avoid damaging the knurl.
Use a Stiff-Bristled Brush or Toothbrush: If the knurl has stubborn buildup, dip a stiff-bristled brush or toothbrush into the cleaning solution.
Scrub the knurl in a circular motion, applying gentle pressure. Ensure that the bristles reach into the grooves of the knurl.
Rinse with Water: Once you have a clean barbell knurling, rinse the barbell with clean water from a sink or hose.
Thoroughly remove any leftover cleaning solution, ensuring it does not stay in the knurl.
Dry the Knurl: Use a dry microfiber cloth or towel to remove excess moisture from the knurl to ensure that when you are ready to do a deadlift, you have a clean barbell knurling.
Ensure it is completely dry before proceeding to the next step.
Inspect the Knurl: After cleaning and drying, inspect the knurl for any remaining debris or residue.
If necessary, repeat the cleaning process or use a toothpick or soft brush to remove any stubborn particles.
Apply Lubricant (Optional): If desired, you can apply a small amount of 3 in 1 barbell oil.
This will help maintain the grip and clean rust off barbell.
4 Alternative steps to clean barbell knurling and shaft
Wiping off: Wipe off any apparent dust or mud using the microfiber cloth
Apply oil: apply the 3 in 1 barbell oil or WD-40[not recommended] on the barbell.
Rub with nylon brush: Rub throughout the shaft using the nylon brush.
Use microfiber cloth: Now use the cloth to wipe off
9 steps guide to Cleaning barbell sleeves

Prepare the Cleaning Solution: Mix a small amount of your chosen cleaning solution with water according to the manufacturer’s instructions.
Alternatively, if using dish soap, add a few drops to a bowl of warm water.
Dampen the Cloth or Towel: Moisten a microfiber cloth or towel with the cleaning solution. Ensure it is damp but not dripping wet.
Wipe Down the Sleeves: Use a damp cloth or towel to wipe the exterior surfaces of the sleeves. Pay attention to removing any visible dirt or grime.
If there are any sticky or stubborn spots, apply slightly more pressure while wiping.
Clean the Inner Parts of the Sleeves: Insert a stiff-bristled brush or pipe cleaner into the sleeves of the barbell.
Move the brush back and forth, rotating it to access all areas inside the sleeves. This will help dislodge any dirt or debris that may have accumulated.
Scrub the Sleeves: Dip the brush or pipe cleaner into the cleaning solution and scrub the inner surfaces of the sleeves.
Work the brush or pipe cleaner up and down, ensuring that all areas are thoroughly cleaned.
Pay attention to the collar area where the weight plates are attached.
Rinse with Water: Once you are done cleaning barbell sleeves, rinse them with clean water from a sink or hose.
Make sure to remove any residual cleaning solution and debris from the inner parts.
Dry the Sleeves: Use a dry microfiber cloth or towel to remove excess moisture from the sleeves. Ensure they are completely dry before proceeding to the next step.
Inspect the Sleeves: After cleaning and drying, inspect the sleeves for any remaining dirt, debris, or residue.
If needed, repeat the cleaning process or use a toothpick or soft brush to remove stubborn particles.
Apply Lubricant: If desired, you can apply a small amount of 3 in 1 barbell oil or lubricant to the inner parts of the sleeves.
This will help maintain smooth rotation and clean rust off barbell.
YOU CAN ALSO USE THE SAME ALTERNATIVE WAY TO CLEAN SLEEVES AS THE SHAFT
Cleaning the inner components of a barbell
Step 1: Remove the Sleeves
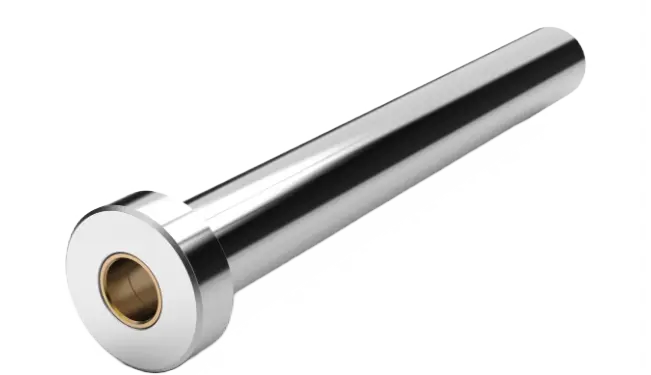
Let’s put the pliers to use. Utilize pliers to grasp the snap ring protecting the end cap of the barbell and pull it backwards for removal.
Once the snap ring(s) is removed, the barbell end cap removal becomes a nothing task. After removing the snap ring gently remove the sleeve.
Note: You might have to remove the full washers and half washers after the snap ring(s) if your barbell has it.
By moving the sleeve back towards the centre of the bar shaft and then removing the washers
Step 2: Clean the Bar
Take a cloth and wipe the areas of the bar beneath the sleeves to remove any rust. Also, give the sleeves a thorough brushing and wipe-down.
Step 3: Apply 3 in 1 barbell oil to the Sleeves
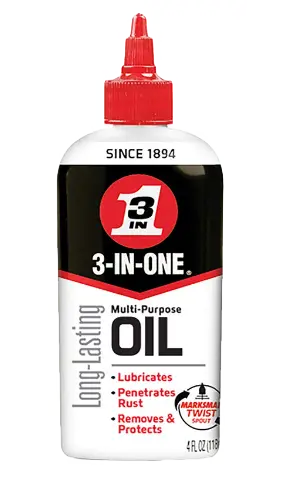
Apply a generous amount of 3-in-1 barbell oil to the area under each sleeve to ensure smooth spinning after cleaning.
Rub it using the cloth, this will ensure smooth contact between the sleeves and shaft
Step 4: Reassemble
Reverse the steps by first sliding the sleeves back onto the bar and then replacing the end cap and snap ring(s)(and washers in some cases)
How often should you clean your barbell

Cleaning your barbell regularly is essential for maintaining its performance, longevity, and hygiene and most importantly to clean rust off barbell
There are 3 general guidelines to consider when determining how often to clean your barbell.
Frequency based on Usage: If you use your barbell frequently, such as in a commercial gym or during intense training sessions, it’s recommended to clean it more often.
Regular usage exposes the barbell to sweat, chalk, and potential debris, increasing the need for cleaning.
Cleaning it after every training session or at least once a week can help prevent buildup and maintain optimal performance.
If you are a normal user that even uses the barbell daily, cleaning once a month will be enough too.
Environment and Climate: The environment in which you use your barbell plays a role in determining cleaning frequency.
If your workout area is dusty, humid, or prone to moisture, it’s important to clean your barbell once a week to clean rust off barbell which is a common problem.
Appearance and Grip: Some weightlifters prefer to clean their barbells more frequently to keep them looking pristine and to maintain optimal grip.
Regular cleaning removes dirt, oils, and chalk residue, ensuring the knurling remains sharp and effective.
If you prioritize aesthetics and grip, cleaning your barbell once a week or after every few workouts may be ideal.
Remember, maintaining a clean barbell not only improves its performance but also contributes to your overall training experience.
Regular cleaning not only helps clean rust off barbell but also prevents corrosion and damage but also ensures a hygienic and enjoyable lifting environment.
How to store your barbell
Firstly, you need to select a storage area that is dry, well-ventilated, and protected from extreme temperatures. Avoid places prone to moisture, such as basements or garages with high humidity levels, as it can lead to rust and corrosion.
Secondly, invest in a barbell storage rack or stand designed specifically for barbell storage. These racks provide a secure and organized space to keep your barbell off the floor and protect it from accidental damage.
You can also use a squat rack or a power rack if you don’t have multiple barbells
Now talking about how to store it.
There are two common ways to store a barbell—horizontally and vertically. Horizontal storage involves placing the barbell on a rack with the sleeves resting on the supports.
Vertical storage requires a barbell holder or stand where the barbell is stored upright. Choose the storage method that works best for your available space and preferences.
Also keep in mind that when storing multiple barbells, avoid leaning them against walls or stacking them on top of each other and storing it with weight plates on.
Leaning or stacking can put unnecessary pressure on the barbells, potentially causing deformation or bending. Instead, use individual storage slots or holders for each barbell.
FAQS
Can I use alcohol to clean a barbell?
Yes, alcohol can be used to clean a barbell effectively.
What not to do with a barbell?
Avoid dropping a barbell on hard surfaces or using it as a lever to lift heavy objects.
Why is it bad to drop an empty barbell?
Dropping an empty barbell can damage its structure, including the sleeves, and lead to bending or warping.
Does barbell burn fat?
While barbell exercises can contribute to fat loss through increased muscle mass and calorie expenditure, a balanced diet and overall exercise routine are essential for significant fat loss.
Can I do the barbell every day?
It’s generally not recommended to do barbell exercises every day, as muscles need time to rest and recover.
Incorporate rest days and alternate between different muscle groups for optimal results and injury prevention.
Wrap it up
Although we don’t pay much attention to cleaning our gym equipment (especially barbells ) regular cleaning leads to better exercise form as the equipment is more fluid hence better gains. SO GET THE CLEANING KIT ON!
About me

Hi, I am Abdullah a guy whose passion for fitness led to his bachelor’s degree in exercise science, for me what started as a personal fascination soon transformed into a professional career. Over the last six years, I have had the privilege of guiding and supporting numerous individuals on their own fitness journeys. Whether they were beginners taking their first steps into the gym or seasoned athletes aiming to break their personal records, I have been there every step of the way, providing personalized training programs tailored to their unique needs and goals.